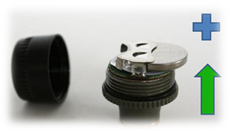
Installing the CR1632 Batteries
Install the CR1632 Batteries, plus side up, on each transmitter. Press and release the top button. The A1A will light up with a blue-backlit display.
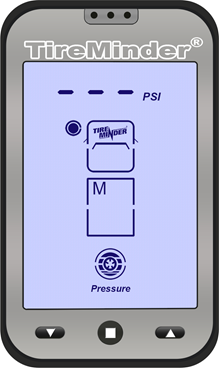
Monitoring Mode (“M” On the Screen)
The first screen you will be presented with once the monitor is on is the Monitoring Mode (M). If this is the first time turning on the monitor, your monitor will look similar to the photo on the right.
“M” is the mode you will need to be in to receive updates and alerts! This will be 99% of the time after completing the initial set up.
Restarting the monitor will always bring you back to monitoring mode. (Pages 36 & 37 “Power On”)
So, the monitor is on (charged), the booster is wired up, and the batteries are installed in the transmitters. You are now ready to attach the transmitters to the valve stems and “LEARN” them to your monitor.
Learn Mode (“L” On The Screen)
With an “M” showing on the screen, press and hold the right and left buttons for 5 seconds. When all 22 tire positions appear, let the buttons go. You will see an “L” on the screen. That stands for?? Right – Learn!
Tip: For better understanding, read Page 22, 23 & 24 before proceeding.
Two things to note in this “L” mode are the solid blinking circle and the red light at the top. The solid blinking circle indicates the current tire position and the red light tells us no transmitter has been “Learned” to that location.
To “Learn” a transmitter, press the right or left button to scroll to the position you want. Once there, attach a transmitter to that tire’s valve stem. The light will turn green (within 5 to 20 seconds) and you will see that tire’s pressure on the top of the monitor. Congratulations!
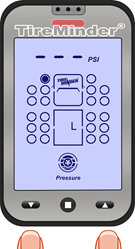

Using the right or left buttons, move to the next tire position you wish to monitor. Again you will have a red light which will turn green. Repeat this procedure until you have installed all the transmitters.
You must now EXIT from the “L” mode. Press and hold the right and left buttons until the 22 tires disappear and you see the letter “M” on the screen. You will now only see those tire positions to which you have “learned” transmitters.
Do not worry about the red light at the top of the screen. That will go away after the next step.
For slightly more info on the “L” mode, see pages 21 & 22.
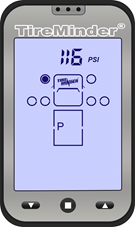
Setting Baseline Pressures (“P” On The Screen)
It is now time to teach your monitor what pressures you run in your rig. From the “M” mode, press and hold the center button for 5 seconds. When you hear a beep or see the letter “P” appear on the screen, let the button go. In this mode you raise or lower the baseline pressures (customizing the monitor to your needs). Use the right or left buttons to adjust the numbers up or down. Press the center button to move to the next tire. After you have set the last tire’s baseline, press and hold the center button again for 5 seconds. When the “P” changes to “M”, you are finished. Any red flashing light will disappear after 10 to 20 minutes. This is an important step. We recommend you see pages 22 & 23 for more info.
Congratulations! You are good to go. Press the right or left button to see each tire’s pressure and temperature. This is what you will be able to do before you get on the road or at any rest stop along the way. Please do not check the monitor if you are driving (it’s just like texting and you know you are not allowed to text while driving!!)

Minder Division of Valterra Products
3000 SE Waaler Street
Stuart, FL 34997
Was this article helpful?
That’s Great!
Thank you for your feedback
Sorry! We couldn't be helpful
Thank you for your feedback
Feedback sent
We appreciate your effort and will try to fix the article